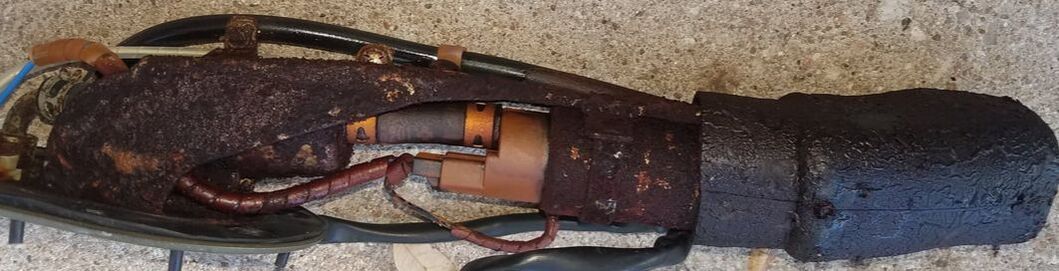
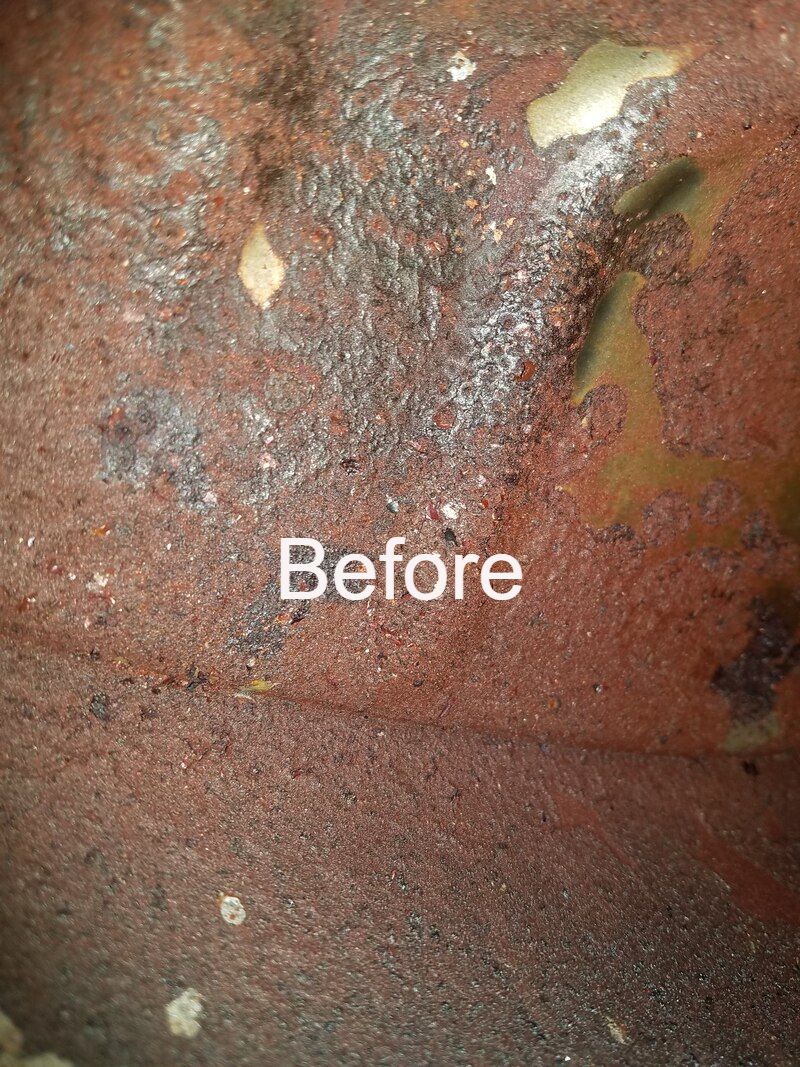
 Much better... This is the result of about one gallon of gas left in a three gallon tank for five years. The nasty object above is the in-tank fuel pump and integrated fuel filters. That is pretty easy to fix. All you need is $500 and the time to remove it, rebuild or replace it, and reinstall a few bolts. Not cheap, but pretty easy. (Sure, you need to drain and remove the gas tank, which may require a pump and lots of disassembly time...and then you need to put it all back together correctly, but that isn't rocket science either.) The inside of the tank itself is a bigger problem.
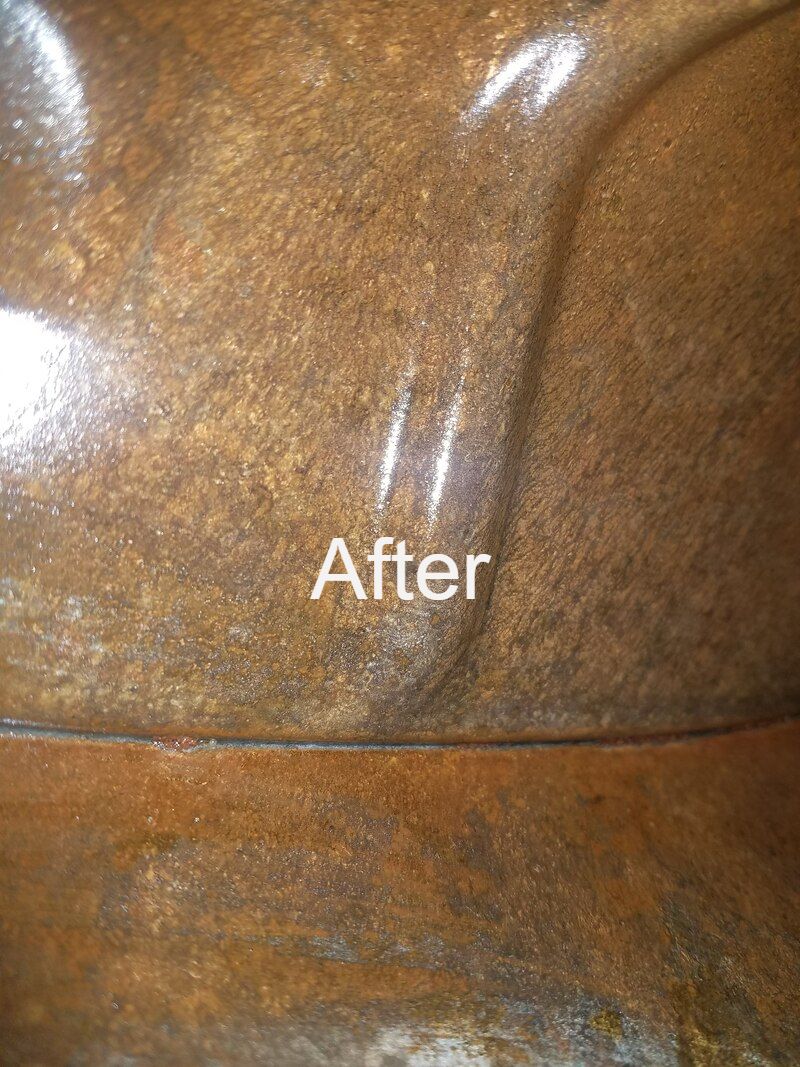
The rehabilitation of rusty fuel tanks seems to be a religious matter. Doctrine ranges from "Don't...just replace it", to "Clean it and coat the inside with (insert the name of some sort of paint-like product here) ." And recommended methods for cleaning are all over the map too, ranging from "Rinse out the chunks and call it done." to "Fill it with (wood screws, abrasive, BB's, etc.) and (shake it, tumble it, vibrate it, etc.) . I have tried some alternatives and today I generally take a middle of the road approach. I will say, if I had a big tumbler system or high powered ultrasonic wand that I could insert, I might do differently, but I don't. So I keep it simple.
I do not paint / epoxy tank interiors. I believe it is risky (the paints can degrade / flake off) and that fuel filters are really pretty good. Sure, keep a weather eye on your fuel filter(s) after you start riding again. If they start filling with rust then further intervention may be needed. But if you care for your tank with two final steps, that is not likely to become necessary. Step 9 - Fill your tank all the way on your way home from each ride. The water in the tank does not (mainly) precipitate out of the gas. It mostly enters your tank in the form of humid air. Once inside, the water condenses out of the trapped air in the tank and falls to the bottom of the pool, where it does its dirty work. If there is no air space at the top of your tank, there is no water vapor to condense inside, and your rust problems are considerably reduced. Naturally there are other alternatives. You can drain the tank absolutely dry. That works too. Step 10 - Ride often. (Or at least run the engine for a half hour each week...and then top up the tank with new, not stored, gas.) But here's a word of caution regarding that full gas tank. Modern Ethanol-mix fuel harbors bacteria that eat ethanol and piss Acetic Acid...which will eat everything metalic in your fuel system, especially aluminum parts. Yes, I know I just recommended filling a rusted tank up with 30% Acetic Acid, but I also said get it all out when you are done. The bacteria in your tank are kinda slow growers, but if a tank has been sitting for a month or so, even a completely full tank, the bacteria bloom is underway and will accelerate exponentially over time until the bugs die in their own piss. If you have ever seen and/or smelled green fuel in a tank, you have seen the aftermath of a bloom for yourself. If you are not going to keep fuel rotating through your tank (burning up the blooming bacteria and re-filling with fresh gas) then at least use a fuel preservative product like Stabil, to keep the buggers at bay for a few months. If it is going to be longer than that, drain that tank...completely dry. (Full disclosure: water does come into the tank mixed in solution with the ethanol in the fuel. Water does not mix with gasoline, but it does mix beautifully with alcohol, as your bartender can readily confirm. And any batch of ethanol-gas you get may have water trapped in the ethanol. If you get a tank with high water content, the next tankfull is likely to dilute the concentration of water in the tank. Just another reason to keep using the gas in the tank regularly.) So...either drain that tank dry or fill it full and burn some off every week. Don't give rust a chance. Like Neil says, better to burn up than it is to rust. 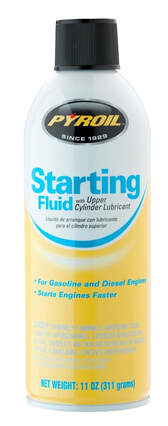 One of Many Brands One of Many Brands Internal combustion engines need three things to run. Fuel, Fire and Compression. If the correct amount of fuel (and air) is in the cylinder, and the mix is properly compressed (to somewhere near 1/9th of it's uncompressed volume), and it gets a spark, the mix will explode. Physics. It cannot do otherwise.
Granted, lots of things need to happen properly in an engine for all that to come together and happen at the right time in the piston cycle, but that remains the core principle of internal combustion engines. To troubleshoot an engine that is not running, or not running properly, those are the three main issues to consider. COMPRESSION Lots of things can cause a loss of compression, but they all come down to the cylinder having a leak. Mechanical wear, blown gaskets, defective seals, dirty / leaky valves or bad valve timing can all cause a loss of compression. Fortunately, serious compression loss is fairly rare...and that is good, because it is always the most expensive problem to solve. Engines are built, first and foremost, to continue to hold compression through their service life. The good news is that if you have verified fuel and fire, checking compression is among the easiest test to do on an engine. Still, it is rarely a sensible place to start your troubleshooting. Failures in the fuel supply and ignition systems are far more common. FIRE Outside of flat running out of gas, ignition failure is by far the most common cause of an engine failing to run. And that is great, because it is the easiest problem to check directly and is often the cheapest problem to fix. The easiest ignition check is to unplug a spark plug wire, remove the spare plug, reconnect the plug wire, ground threads of that plug to the block, and crank the engine. If you can see a nice blue-white (or even reddish) spark you can PROBABLY say ignition is ok and move on. I say "probably" because if you do see a spark, you still do not know if the spark happening at the right time. If you don't see one, you do not yet know why. Maybe the plug is bad, or maybe other ignition components are bad and you still need to track that down (or maybe the kill switch is turned on!). But at least you know the next path to follow. But, there is actually something that is even easier to check, if only indirectly. And since we are trying to zero in on the main problem area quickly, easy counts for a lot. And the easy test involves the third leg of the stool...and is often a great place to start your troubleshooting. FUEL So, we have already assumed you are not out of gas...but on a small engine, you better make sure the fuel valve (often called a "petcock") is open and fuel is actually flowing. Next up on smaller machines, including most motorcycles, is the carburetor, which regulates the amount of fuel that is supplied to the engine under various throttle and load conditions. Larger, more sophisticated, less polluting, engines get their fuel via a fuel injection system. Let's start with carbs. Carbs have tiny passages in them, through which tiny streams of fuel flow, that ultimately get mixed with the air coming into the engine. Just a little schmutz in any of those passages can put a carb out of commission. A failed fuel pump or clogged fuel filter can also stop the music (in fuel injected motors too). If your machine has been sitting for a few months with fuel in it, there is a very good chance your carb is plugged up and needs to be cleaned. But let's not jump to conclusions. While you can look at spark plug and get a pretty good idea of whether or not it is sparking, you cannot just look into a carb and see whether or not it is working properly. Fuel injection systems in gasoline engines are almost always computer controlled, and with proper diagnostic tools, can often tell you if and why they are sick. But for a carbureted engine that has no blinky lights, it is not so easy. What to do? Well, obviously, you cheat. (And the cheat actually works on fuel injected engines too.) One of the products you will find on the shelf at every auto parts store is a can of "starting fluid" or "starting spray". The can will contain a cocktail of flammable chemicals, usually including ether, which vaporizes easily and happens to burn like crazy. A spray can of starting fluid is a great diagnostic tool. Remove the air cleaner so you have a clear shot at the intake, give it a one second blast of ether, and immediately crank the engine. If it fires and runs for a few beats (perhaps for a few seconds), you now know that you have reasonably good ignition, firing at (at least approximately) the right time. You know you have at least marginal compression. And you know that you just supplied the missing element...fuel, more specifically, vaporized fuel. (Engines do not run on liquid fuel. They run on vaporized fuel.) Now you have a pretty good idea where to look...the fuel delivery system. Ignition may not be perfect, but it was good enough to fire the ether. Compression may not be perfect, but it was good enough to explode the ether. So right now the fuel delivery system is the prime suspect. Conversely, if the engine did not fire with ether, you PROBABLY have an ignition problem and should at least do the easy ignition test (pull a spark plug and check for good spark). If you see good spark AND the motor will not fire on ether...well, now you are in for an education. It is time to dig deeper. 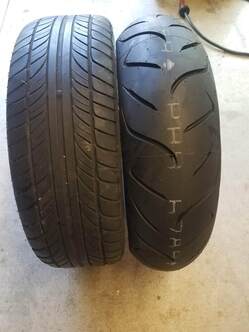 So...you aren't supposed to talk about religion and politics in gentele company, right? Well, I am going to put on my big steel-toed boots and stomp right into the middle of a hot religion topic in motorcycling...using car tires on motorcycles.
"What kind of lunatic puts a car tire on a motorcycle?", you might ask. I cannot say with absolute certainty, but the evidence suggests to me that they are, at their core, shortsighted cheapskates; the sort who try to seal up a cavity in their tooth with superglue to avoid paying a dentist, only to reap an abscess and need dental surgery later. Why would someone even consider this insane idea? Well, motorcycle tires are not cheap, particularly not good motorcycle tires. And the labor charges to install them are often almost as much as the tires themselves. So it can cost almost as much to put two tires on a bike as it costs to put four tires on a car. That, understandably, rubs some folks the wrong way. Worse still, motorcycle tires may last 10k miles or even less, so they get changed much more often than car tires. In short, tires represent a significant cost of ownership to a motorcycle rider. Nobody who has followed my work will be surprised I say that those who are not willing to pay what it costs to operate a bike safely, shouldn't own or ride motorcycles. But what are the safety issues? They all come down to the key mission of the tires...keeping the bike stuck on the roadway rather than sliding over/off it. Car tires present two obvious significant challenges to that mission. TIRE PROFILE So this is kind of a no-brainer. Bikes lean when they turn. They must lean to turn. The rounded cross section of a motorcycle tire produces a near-uniform contact patch (that part of the tire surface that is in contact with the roadway), no mater what the lean-angle of the bike. The car tire, in contrast, has a rectangular profile and typically, very stiff sidewalls, so as the bike leans, the contact patch of the of the tire shrinks as the main body of the tire lifts off the roadway. Not good. TIRE COMPOUND The other big issue is the tire's grip on the road...traction. Traction and tread life are the core tradeoffs in tire design. Hard rubber wears off slower than soft rubber, but soft rubber grips better than hard rubber. You may be able to visualize soft rubber oozing into the tiny pits in a paved roadway, while a harder rubber only makes contact with the tops of the roadway texture. Some motorcycle tires, particularly those for touring bikes that do lots of highway miles, finesse this issue with a multi-compound design. The center of the tread area is made with a harder rubber for good wear when the bike is rolling straight ahead, but the outer portions of the tread surface, between the center area and the sidewalls, are built with a softer compound that provides better grip when the tire is leaned into a turn. Car tires, which are not only designed for a heavier vehicle (and so have a harder tread compound for suitable wear in their intended application) but are also designed for a vehicle suspension system that is designed to keep the tire upright in a turn, making a multi-compound approach less useful. BUT WAIT, THERE'S MORE Or perhaps, there is less. In this case, less contact with the bead seating surface. "Bead" may be an unfamiliar term in the context of tires but here it is in a nutshell. It is the part of the tire that seats against the wheel and provides both the air seal that keeps the tire inflated but also provides the structural connection between the tire and the bike. The bead on car tires are designed to seat / seal / hold to the rims of car wheels (duh). The bead of motorcycle tires and seating profile of motorcycle wheels are different. Perhaps they did not need to be, but bikes weigh much less than cars and the cornering forces placed on car tires are different from those put on motorcycle tires, so the tire seating region is smaller than is found on car wheels. Or to consider it from the other perspective, a car tire expects a different, larger bead seating region on the wheel, and therein lies the rub...or perhaps the lack of a rub. The seating surface on a motorcycle wheel is not right for a car tire. GOOD ENOUGH? You may hear someone say, "But it works fine!". Well, that depends on your definition of "fine". Yes, as a rule, a car tire can be induced to hold air when mounted on a motorcycle wheel. And depending on the bike and the car tire selected, the tire will clear the surrounding suspension structure of the bike so the bike can roll. Let's even say that we are willing to accept the traction and handling compromises introduced by a car tire (I cannot imagine why you would, but let's say so, for the sake of argument.) What else is there to consider? What about emergencies? DEFLATION EMERGENCIES The car tire shown in this article came into the shop mounted on a motorcycle wheel. It did something very interesting when it was deflated. It spontaneously dismounted itself from the motorcycle wheel. That is to say, the tire bead became unseated from the wheel without any additional force being required. OMG! If you have never mounted new tires on car or motorcycle rims, you may not be aware that, once seated on the wheel, removing that tire from the wheel requires considerable side force. Getting the tire unseated from the wheel is the main mechanical challenge in any tire change job, followed by the challenge of getting the tire off the wheel after it is deflated and then, finally, by the difficulty of getting the new one onto the wheel. That may not sound surprising...but the first item on the list is critical from a safety point of view. If we do not know anything else about tires, we know that they sometimes go flat. But we also know that they rarely come off the wheel just because they have lost air. Yes, a massive blowout can shred a tire and leave you with a bare wheel, but that is rare and virtually never happens to tires until they are used long past the end of their service life. On a car, a tire dismounting from a wheel causes damage to the wheel and perhaps the bodywork. It could even cause a loss of control and an accident. However, on a motorcycle, it WILL cause a loss of control, and that, for motorcyclists, is often deadly. SUMMARY Of all the hazards a car tire presents to a rider, the most insidious is the risk of a low pressure spontaneous dismount of the tire. Because car tire sidewalls are made for much greater loads than motorcycles offer, an inattentive rider may be on an under-inflated tire without realizing it. The tire may not "go flat". However, at some point, as inflation pressure continues to fall due to a small leak, the tire may no longer keep its grip on the motorcycle wheel. That dismount event is most likely to occur when the rider enters a curve...and is most likely to occur when entering a high speed curve. How's that for a nightmare scenario? Granted, motorcycle riding is not an enterprise for seriously risk averse folks. But it is an enterprise that tends to weed out the reckless. Using a car tire on a motorcycle may not get you killed, but it absolutely lowers your chances of survival. It's not worth it to me. Make your own call. (But I will never mount one for anybody in my shop.)  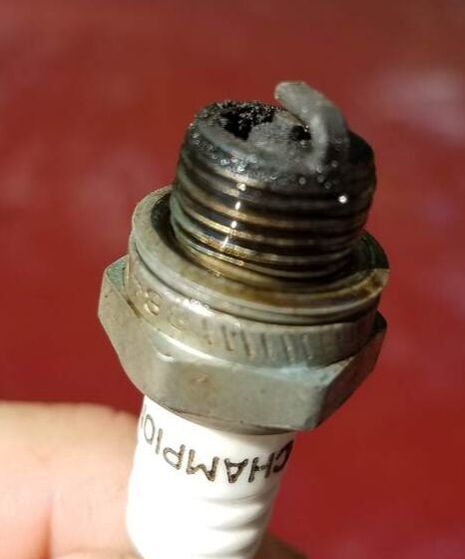 The only thing that stands between your engine and death is oil. Did you know (I was shocked when I leaned), that the major turning loads in your engine are NOT supported by ball bearings, or roller bearings, or anything else that rolls? All the main loads are carried by a round part stuck into a round hole, with room for just a microns-thin film of oil between the shaft and the hole. That's it. A thin film of oil. And how those parts suffer if there are bits of dirt or metal in that oil. And may the engine gods have mercy on your engine's soul if the oil is gone. Metal rubs on metal, heat builds up, the metal expands and soon the gap is gone and the shaft welds itself into the hole...and that's the end. So...dirty oil and low oil...bad, bad, bad. But what happens if there is too much oil? Mechanical sickness and engine death are ready and waiting for you there too. Let me count a few of the ways... Why do I bring this up? This year I have had three over-oiled machines come into the shop. One wouldn't turn at all. One wouldn't run. The third, fortunately for the owner, had already died and the engine had been over-filled in a misguided attempt to revive it, so it was never re-started with too much oil, fortunately for him. The basic problem is that excess oil goes places it shouldn't. More on that in a moment. The other problem, is that with most engine designs, excess oil gets splashed excessively...to the extent that it becomes foamy... foamy oil doesn't flow, and cannot go where it is needed...which is just as bad as having too little oil. How does this happen? The connecting rods that connect the pistons to the crankshaft travel down into the upper reaches of the oil pan at the bottom of the engine. If they hit the oil, it splashes and becomes filled with air bubbles...it foams. So, too much oil puts oil was where it was not supposed to be (too high in the oil pan) and foamy oil is the result. You recall I mentioned the over-oiled engine that would not turn? That engine had a horizontal cylinder. It pointed sideways rather than mostly up. It was a lawnmower and most lawnmowers are designed that way. In that case, while the engine was off, the excess oil seeped past the piston rings and filled up the cylinder. The cylinder is not supposed to have anything inside it but air and a few molecules of fuel. When the owner went to start the engine, the piston could not rise in the cylinder because the cylinder was full of oil. Air will compress; liquids, including oil, will not. The piston might as well have been welded to the cylinder walls. It would not budge...until we pulled out the spark plug and drained out the oil stuck inside the cylinder. After that, we drained the oil down to normal level, cleaned, dried and reinstalled the spark plug...and fired it right up. The next guy was not so lucky. The next engine would turn, but wouldn't run. The plug was completely fouled (caked with residue burned carbon from burning too much oil), the air cleaner was soaked with oil and the exhaust was dripping oil. In this case, the cleanup required was a little more extensive, but in the end, the result was the same. After draining out the excess oil, getting a new clean filter and a clean plug, she fired right up. She smoked like crazy as the excess oil in the exhaust burned off, but after running for five minutes, the excess oil had cooked off, the smoke stopped, and she ran like a top. So, how does one prevent this ugly problem? First, read. Read the manual. These days, a little Google searching will turn up reliable documentation on your engine that will tell you how much, and what sort of oil your engine needs. Next, check the dipstick. Most engines have a dipstick, and those that do not generally have a sight window that allows you to see the oil level from outside the engine. 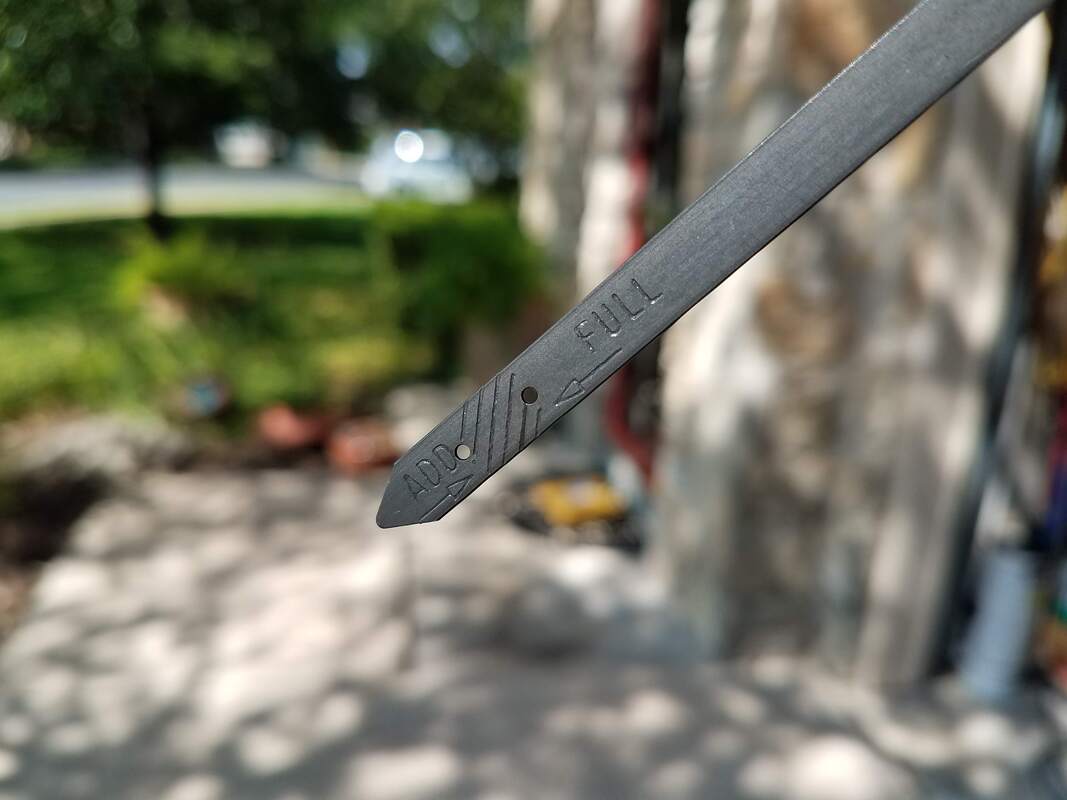 After the engine has been off for at least a few minutes, sitting on level ground, pull the stick, wipe it clean, (like the one you see above), stick it back where it came from, and pull it out again. When you do, you should see oil on the stick, somewhere between the ADD and FILL marks. Too low on the stick, add oil. Too high on the stick, like you see in this next photo, (You see the stick is wet right up to the L's in FULL, way past the point of the FULL arrow)... 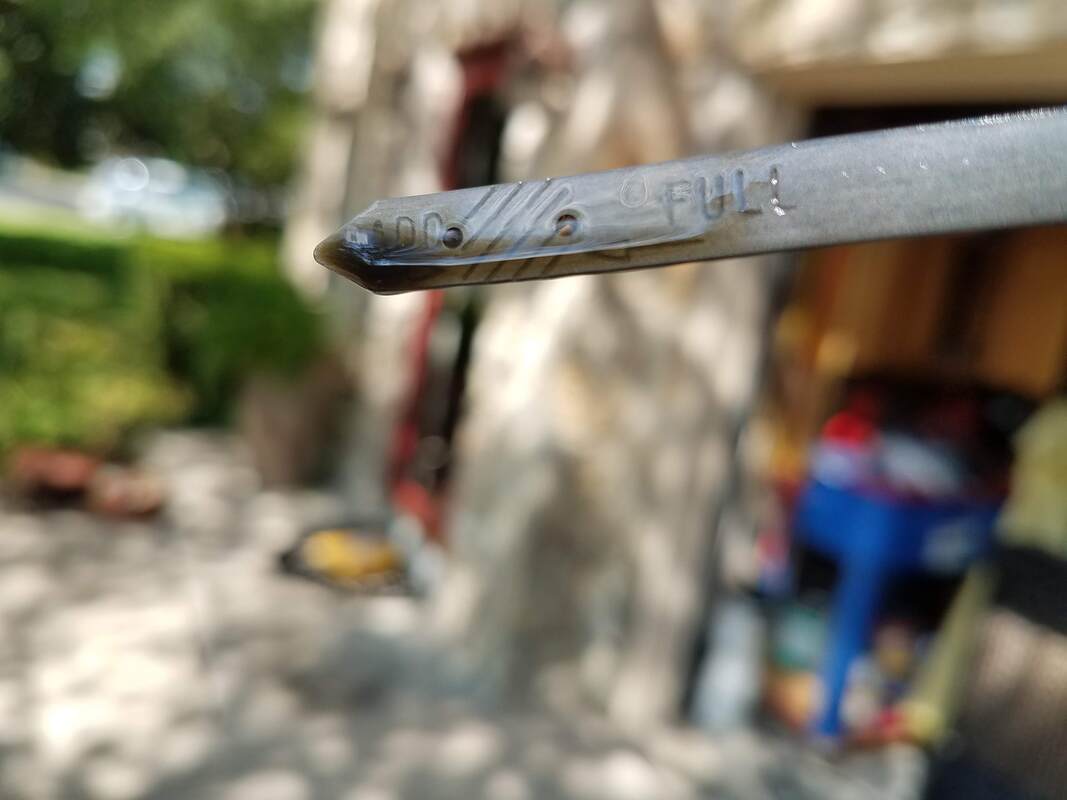 ...then it is time to get rid of some oil. Drain some or use something to suck it out (something besides your mouth, like a plastic tube and a turkey baster!). Once your oil level is right, your mechanical life can go back to normal.
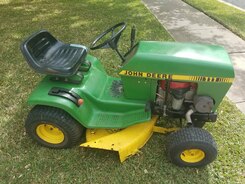 Some things were just obvious. The battery was missing. She was covered with dirt and chaff from sitting in an open pole barn on a farm near Taylor for a few years. Her tires were flat and her ignition switch was gone...and her model number indicated she was pushing 40 years old. But when I reached in and grabbed the output pulley, and tried to turn it by hand, her engine would move...so off to the shop she went and the search for parts got underway.
She had fuel in the cylinder. The spark plug was sparking. The compression was ok. What the heck?! All you need is Fuel, Fire (at the right time) and Compression and an engine will run. It must run. The starter spins the motor like a demon, but it won't start. It won't even pop once. It is definitely NOT running. What's happening?! Have you guessed yet? Yep. Ignition Timing. Spark really does need to happen at the right time. This engine has a three-phase alternator integrated into the flywheel and the top of the engine case. It is so simple it doesn't even have a voltage regulator. It keeps the battery charged...barely. But that's it. It has nothing to do with the ignition system. 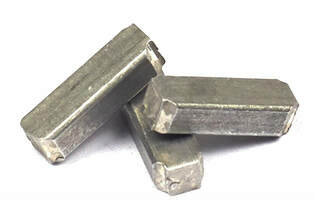 In addition to the magnets that form the alternator, there is one more magnet mounted in the perimeter of the flywheel and it swings past a coil of wire that is connected to nothing except the spark plug. When the magnet comes by, it generates a pulse that sparks the plug and fires the charge in the cylinder. Simple. No points to set. No condenser to short out. Foolproof...except for one little detail. Recognize these shiny little aluminum rectangles? They are Woodruff Keys. The position of the flywheel on the crankshaft is critical because the ignition magneto must cause a spark at exactly the right time in the engine cycle. One of these little woodruff keys fits into a slot cut into the crankshaft and a matching slot cut into the hub of the flywheel, so that when the flywheel is mounted on the shaft, it is certain that the alignment is exactly correct...unless... Sometimes something happens...a backfire...and violent engine stop...a loose flywheel bolt...and the flywheel rotates on the shaft anyway, shearing the poor little soft aluminum key (but absorbing energy that might otherwise do more damage), and screwing up the ignition timing. The solution? Pull the flywheel, realign it with a new key, torque the mounting bolt to spec and try again. And she fired right up. Ran like a top. Two days later she was back on the job, roaring through grass like a 20 year old! Way to go Deere! 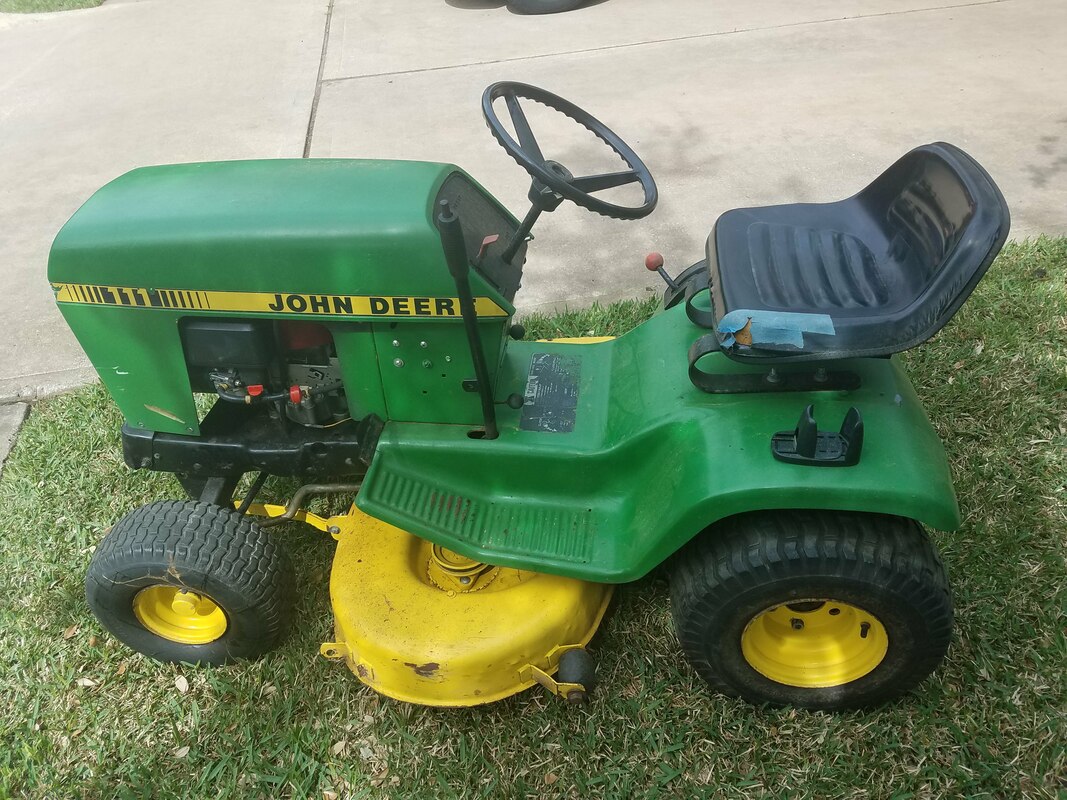 |
Categories
All
Archives
January 2024
|
 RSS Feed
|
© WrenchMonster 2018
|
WrenchMonster™ is a Division of DemonLite, LLC.
|