|
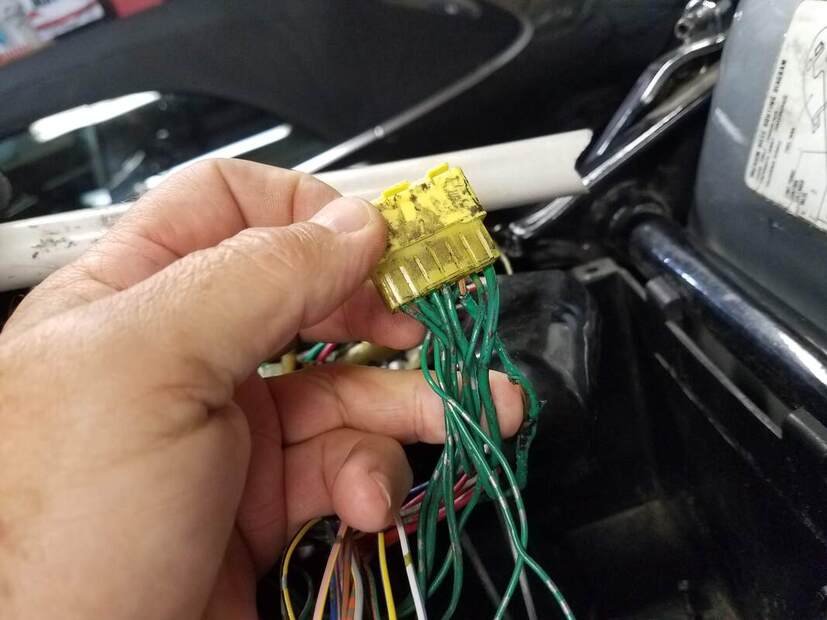
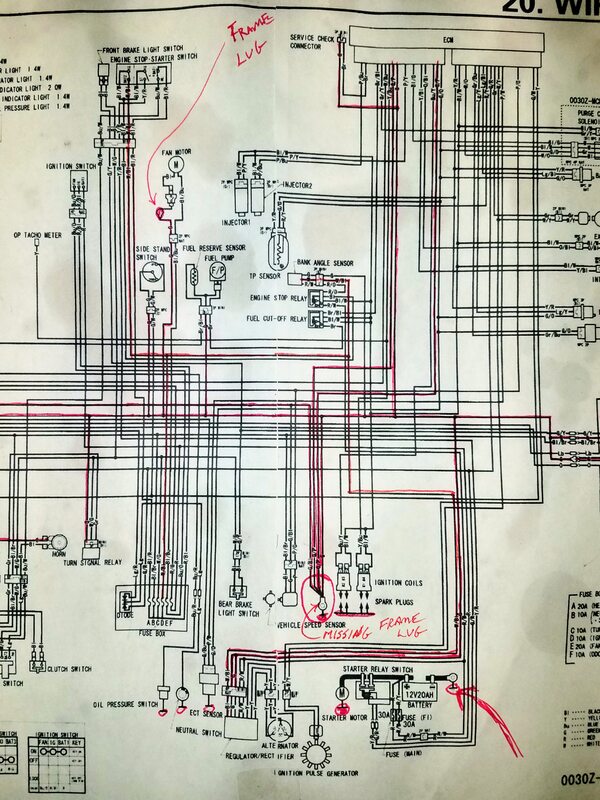
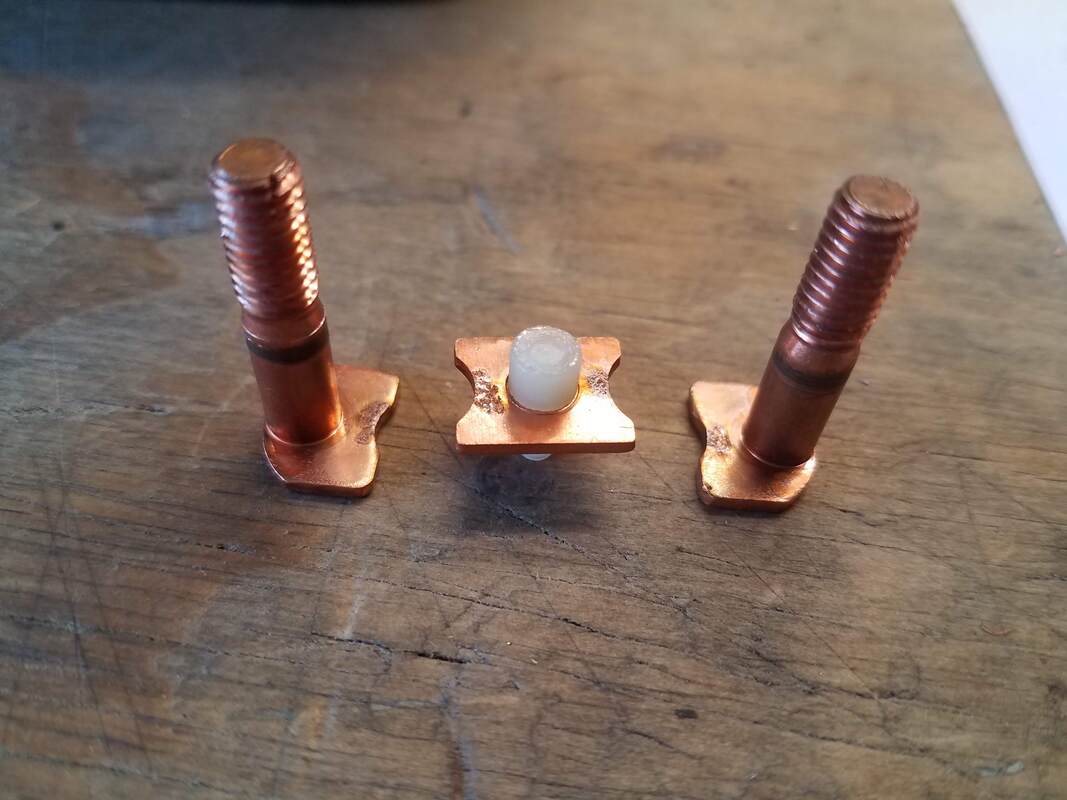
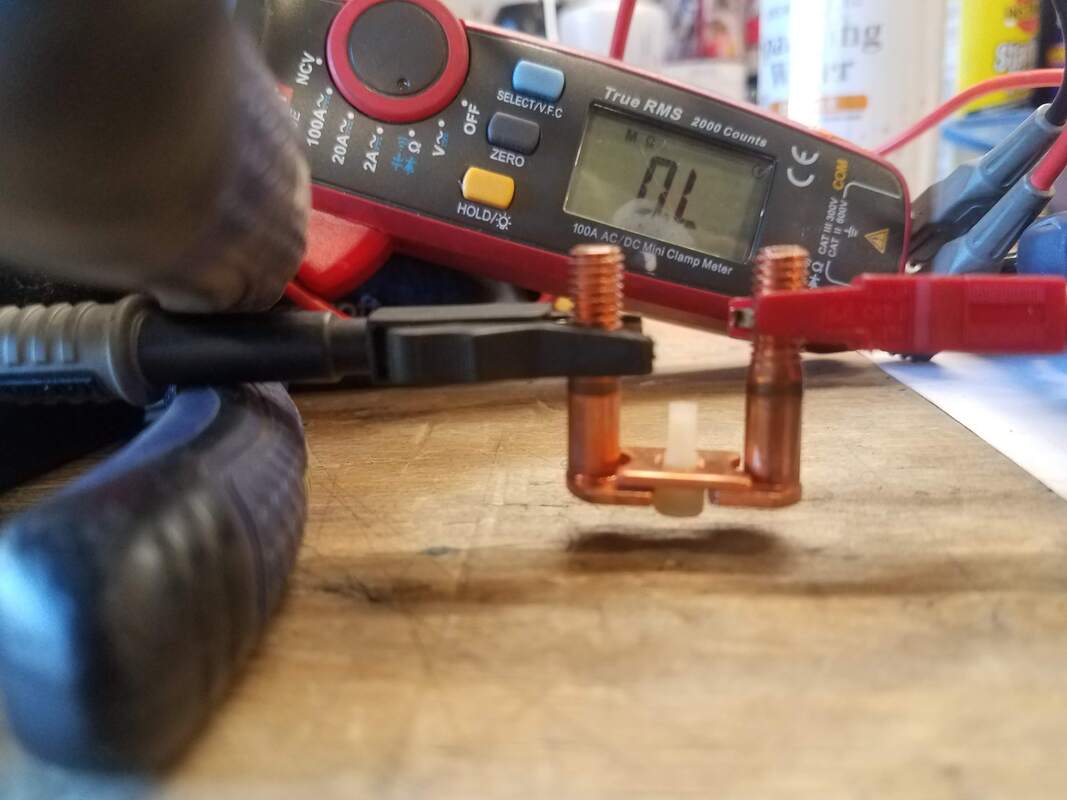
See that burned wire? When this 2002 Honda VTX 1800C heavy cruiser came into the shop, she had been parked for 5 years with an electrical bug. Over the months preceding her last ride, she had run worse and worse until finally an attempted restart resulted in smoke curling up from under the seat and fuel tank. The owner wisely gave up trying to start the engine so, thankfully, a fireball was avoided. The owner had some wrenching experience, so he pulled the seat and tank and found burned wires but no blown fuses. Nobody seemed to have any clues about what to do, so the bike just sat. When the VTX came in, other than being partially disassembled, she was pretty as a picture...but missing her battery and had a third of a tank of rusty gas. Some of the smoked wires were visible and the story was that she had run very badly at low RPM before she finally died, and that part of the difficulty before the bad running developed, was that attempted starts often failed because the starter motor often wouldn't turn. Some mechanical pundits had suggested a bad battery, others suggested a bad starter, others suggested a bad starter relay, all of which had been replaced on various occasions to no avail. Very interesting. Step one was a deep dive into the bike schematic to see how a GROUND wire in the harness could burn up without blowing any fuses. Interestingly, the bike did have a Honda Service Bulletin for an electrical issue... The VTX-1800C, for a time, rolled out of the factory (a USA factory) with the far end of the main ground wire from the battery connected to the wrong place on the frame of the bike. But that fix, putting the ground lug where it belonged, had been long since done. Something else was amiss. Close reading of the schematics and tracing out where all the ground wires went didn't offer much help. Everything in the schematic looked pretty normal. The fun started when the bike wiring itself was compared to the schematic. Uh Oh... The bike itself was missing a ground lug connection...THE ground lug connection...the main ground junction in the wiring harness where all the smaller ground wires from all over the bike come to a single ground lug that gets solidly bolted to the frame. The result was that ground current from every device on the bike that was not itself grounded directly to the frame (such as the Fuel Injection System and the Starter Relay) was being routed through a very small wire that ran about two feet long from the harness ground junction under the seat (shown in the photo at the top of the page), under the gas tank, to a small secondary grounding lug adjacent to the radiator at the front of the bike. Yep, you guessed it...the very wire that had gotten so hot it melted and/or burned away its insulation. Other high current items like the spark plugs, the starter motor and the radiator fan motor were all grounded directly the the frame itself...which was connected back to the battery with the big fat battery ground wire via the now repaired battery cable main frame lug. But there was still lots of stuff sending current back to the battery by way of this poor little, now smoked, green wire. How could this happen? The missing harness ground lug was so bizarre, customer modification of the bike was the most likely explanation...but a call to the local Honda dealer techs confirmed that the connector with the burned wire but no lug, was indeed a stock Honda connector. There is only one explanation, this was a birth defect. The Product Engineer(s) responsible for the manufacturing of the bike at the factory had screwed up TWICE, first by allowing the battery wire frame lug connection error to enter production (resulting in a Service Bulletin), but also by allowing the elimination of the main harness frame lug. Clearly, the bike design team knew the lug was needed to handle return currents from all over the harness. It was right there in the schematic...but not on the bike. That is on the Product Engineering team. That ground lug should not have been eliminated. In fact, it is likely that the missing lug has actually been the primary problem that has plagued VTX 1800s all along...and that the Service Bulletin cured an inconsequential problem but missed the real issue. So why don't all VTX 1800s burn up the little wire that runs from the ground junction to the secondary ground lug? Obviously, the little ground wire was good enough to work kind of ok, at least for a while. Lots of bikes rolled out that door that way without immediately catching fire. One of the things that happens with overloaded wires, even if they are not overloaded badly enough to burn immediately, is that the heat in them slowly bakes the insulation around the wire, causing it to become dry and brittle, eventually causing the insulation to flake off and expose the copper conductor inside. If it is a power wire and that bare copper touches a grounded frame member, sparks fly and fuses blow. However in this case, if a ground wire touches a grounded frame member...nothing happens. It's a ground wire. That is where it is supposed to be connected. So in this case, that is not too big a deal. But because the wire was buried inside the big wire bundle that runs from the front of the bike back to the battery and the computer, making contact with an adjacent power wire in the bundle was a real possibility. Testing revealed that, fortunately that had not happened. The next problem is that the wire's connection points can overheat and carbonize, slowly offering more and more resistance to current flow. At first, that might seem ok too...more resistance results in less current flow and less heat. Sounds perfect. Well, not quite. Passing current through a resistance results in a voltage drop across that resistance. That is how they make electric heaters...the ones that get red hot and keep your feet toasty in the winter. Just how hot it gets is a function of power (watts) and the volume within which that power is being dissipated. If the volume of the conductor where that current is flowing is small, then all the power, all the watts, are being concentrated in that small space...and the temperature in that spot can become VERY high. (That is exactly how an Arc Welder works.) As a result, what may start as a small problem can get worse and worse (a little heat degrades the connection a little, but as time goes by, resistance in the connection gets higher and higher until it finally burns up). But on the way toward that fiery end, all the other items in the circuit served by that connection are being starved for voltage. If it is a 12 volt circuit and 3 volts are being dissipated across the resistive connection, then only 9 volts remain to serve the load device...say the Engine Control Computer, for example. Now we have a plausible explanation for what happened. The overtaxed ground wire slowly got worse and worse, stealing voltage from the engine computer...which controls both the fuel injectors and spark plug pulses. Is it any wonder this bike was running worse and worse until it finally gave up the ghost? And guess which electrical component on the bike that uses the harness ground junction, is the one that consumes the most current when it is operating? That's right, the starter relay; the relay that gets activated when you punch the start button. It was during attempted starts that the overloaded ground wire finally sent up smoke signals. The solution? Rewire the main ground junction to a new frame lug to conform with the schematic...and replace the fried wire that ran from the harness ground junction to the secondary frame lug at the front of the bike. And just to be double-dog sure this NEVER happens again, do a complete overkill on the job and use 8 gauge stranded copper wire to do it. So...with the ground wire and ground lugs fixed, everything should be perfect, right? Yea...not so much. Now with the wiring fixed and a brand new battery installed, attempted starts are a complete crapshoot. Sometimes they work and sometimes the bike does absolutely nothing when the starter button is pressed. Jeez now what? A trouble light connected to the relay coil quickly proved that the relay was getting juice every time the start button was pushed, which was no surprise since you could hear it click every time the starter button was pressed. The problem was the starter relay, the one the customer reported was fairly new (as a result of an earlier failed attempt to cure the hard start problem). Fortunately, it is a quick* fix. Yank out the old one and bolt in the new one, reconnect the battery and off she goes. (* Quick, not cheap. A replacement OEM relay was ~$40. Aftermarket relays that looked exactly the same could be had for less than $10...but buyer review reported very high failure rates...so Honda got the order.) But a bad relay is a bit of a mystery. Generally they are either good or bad. This one showed wildly different contact resistance measurements every time it is tested. So (naturally!), an autopsy was in order. After ripping it apart and looking at all the parts, nothing seemed to be wrong with it . Sure, the internal contacts looked a little pitted...but can that be so bad. Well, it turns out, YES! Connecting the main terminals to an ohm meter and then placing the contactor across the gap (just as it would be when the relay has activated), results in the meter reading "0L" or Over-Range, meaning Infinite Resistance...no circuit, no current flow. no go. These are all solid copper pieces. How can this be? Clearly the carbonizing and pitting shown above on the left is enough to kill current flow in the picture above on the right. Now we have the cause of the no starter reaction when the starter button is pressed...and sure enough, with the new starter relay installed the bike fires right up...
...most of the time. Well, dang. Now what? Sometimes when the starter button is pressed, the starter motor just cannot make the engine spin. And sometimes, it moves it just a bit...and then stalls, like it suddenly got stuck in glue. What's up with that?! Now we finally know why this VTX burned up its overtaxed harness ground wire. It has a failing (or failed) compression relief valve in the engine. Engines with big cylinders (and this 1800cc Twin has some of the biggest they make) have a compression relief system that reduces the air pressure inside the cylinder when the engine is spinning a very low RPM, such as when it is trying to start. Why? Because it is very difficult to get the engine to turn in the compression stroke...when the intake air and fuel vapor charge that the spark plug is about to ignite is being compressed toward the spark plug. If the bike has a kickstarter, a light weight rider might not be able to kick start a big bike without a compression relief system...and if it has an electric starter motor, a successful start without a compression relief system might require both a larger starter motor and a larger battery, which would take up more space, add weight and expense to the bike. But a compression relief system, like any system, can fail and it can fail in at least two different ways: It can fail active and it can fail inactive. In other words, it can fail to relieve pressure when it should or it can get stuck and always relieve pressure, even when it should not. In this case, it looks like the compression relief cam (a spring loaded movable cam surface built into the valve camshaft mounted on top of the cylinder head on each cylinder) is failing to deploy when the engine stops, such that when a start is attempted, IF the engine has stopped right at the start of one cylinder's compression stroke (Reminder: The four strokes of a 4 stroke engine cycle are: Power Stroke, Exhaust Stroke, Intake Stroke, Compression Stroke), then even a perfectly healthy starter motor might not be able to spin the motor. In this engine, the movable cam cracks the exhaust valve open on the Compression Stroke, wasting a little fuel/air mix, but allowing the engine to spin more easily...and therefore faster, to start more easily. Once the engine fires and quickly spins up to idle speed (about 1000 RPM) the cam retracts and full compression is restored, allowing the engine to run at full power. If the cam fails to retract, the fuel waste and reduced compression both conspire to reduce engine power output. So what does this have to do with an electrical failure? Here it is. When the engine is asked to start in a high compression state, the electric starter motor stalls. The starter motor consumes a tremendous amount of current in this condition...over 100 amps. The rider may continue to keep the start button mashed in, or may release it, only to hit it again. The contacts in starter relays are pretty tough, but they are not designed to handle the kind of current flow for more than a fraction of a second. (That current flow drops considerably when the starter motor starts to spin.) Nor are they designed to handle lots of restart attempts in a short period of time. Each start attempt heats the starter relay contacts...and enough start attempts in a short period of time could start to burn the contact surfaces. So the pitted / failed starter relay contacts are not a big surprise at this point. But what about the melted ground wire? As mentioned earlier, the starter motor current does not pass through the wiring harness at all. (See the schematic above.) It leaves the battery, goes through the main lugs of the starter relay, flows through the starter windings, into the bike engine case and frame, and from there, through the main battery wire ground lug, through the battery ground wire and back to the battery. It never goes through the wiring harness at all...BUT...the current that activates the starter relay, that flows through the starter relay windings, that current does go through the harness ground junction...and the starter relay has a big honking winding, that consumes multiple amps of current when it is activated. Bingo. That is where the intermittent high current flow, that eventually fried the overloaded ground wire, was coming from. So...here's the sequence. The spring-loaded, centrifugally released, compression relief cam on the exhaust valve overhead cam lobe (at least occasionally) fails to deploy when the engine stops, making the next start much more difficult. Repeated attempts to start the engine against full compression causes lots of current draw, arcing and pitting of the starter relay contacts, making starts even more difficult...and encouraging the rider to keep the start button engaged for excessively long periods and/or in excessively rapid succession. The high current draw of the active starter relay coil adds to the already excessive current flow through the soon-to-be-fried secondary ground wire as it heads for the secondary harness frame ground lug, because the primary harness frame ground lug is missing...and the wire starts to smoke, creating a general sense of alarm in those around to witness the smoke rising from under the fuel tank. So...what's next? If the fix were free, then determining which of the two camshafts (one on top of each cylinder) has the bad compression relief cam would be next...and it could be fixed or more likely, replaced. However, for the owner, who is not made of money, there is an alternative, at least for now. Live with it. Because the engine does not always stop at exactly the same spot in its cycle, the problematic piston is not always the one that is up to bat. And perhaps the defective mechanism does not get stuck all the time. The fact is that the bike starts just fine somewhere between half and three-quarters of the time. So it falls to the rider to address the problem properly when the problem occurs.
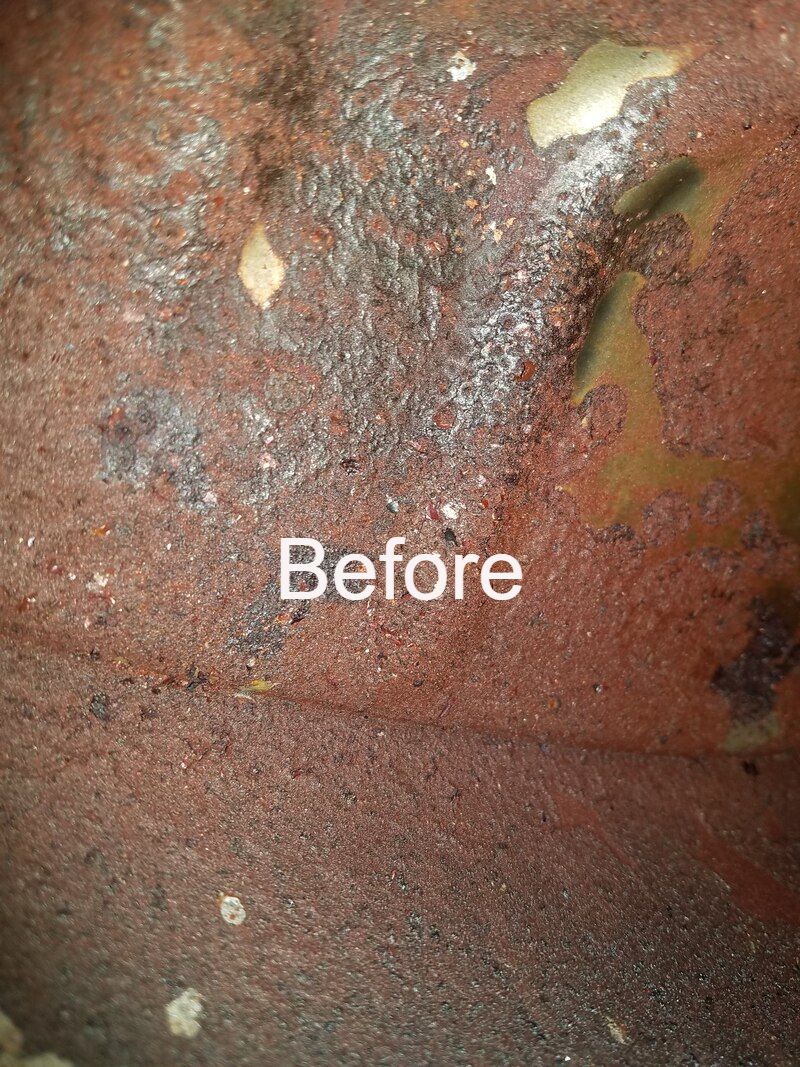
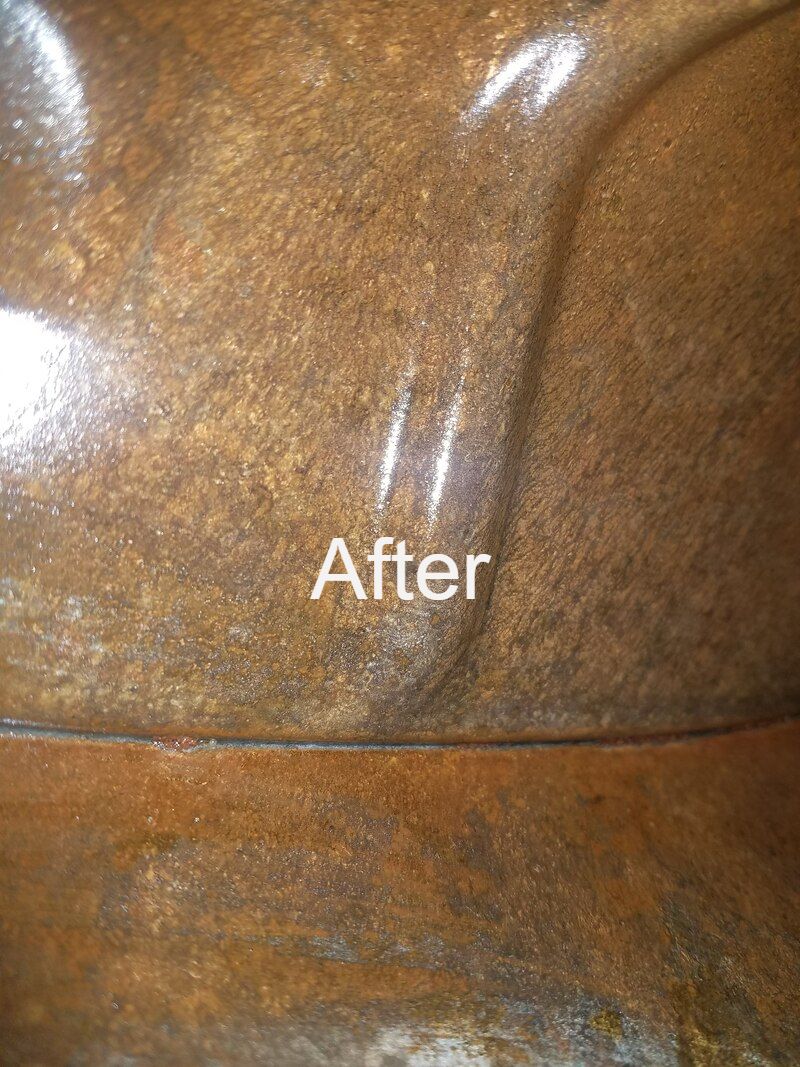
Assuming the failing compression relief system does not get any worse, the owner should be able to operate the bike without too much trouble, saving the near $1000 repair bill that would likely be waiting for him at the end of a camshaft replacement project. Not bad; huh? Now, what about that rusty gas? Much better... This is the result of about one gallon of gas left in a three gallon tank for five years. The nasty object above is the in-tank fuel pump and integrated fuel filters. That is pretty easy to fix. All you need is $500 and the time to remove it, rebuild or replace it, and reinstall a few bolts. Not cheap, but pretty easy. (Sure, you need to drain and remove the gas tank, which may require a pump and lots of disassembly time...and then you need to put it all back together correctly, but that isn't rocket science either.) The inside of the tank itself is a bigger problem. The rehabilitation of rusty fuel tanks seems to be a religious matter. Doctrine ranges from "Don't...just replace it", to "Clean it and coat the inside with (insert the name of some sort of paint-like product here) ." And recommended methods for cleaning are all over the map too, ranging from "Rinse out the chunks and call it done." to "Fill it with (wood screws, abrasive, BB's, etc.) and (shake it, tumble it, vibrate it, etc.) . I have tried some alternatives and today I generally take a middle of the road approach. I will say, if I had a big tumbler system or high powered ultrasonic wand that I could insert, I might do differently, but I don't. So I keep it simple.
I do not paint / epoxy tank interiors. I believe it is risky (the paints can degrade / flake off) and that fuel filters are really pretty good. Sure, keep a weather eye on your fuel filter(s) after you start riding again. If they start filling with rust then further intervention may be needed. But if you care for your tank with two final steps, that is not likely to become necessary. Step 9 - Fill your tank all the way on your way home from each ride. The water in the tank does not (mainly) precipitate out of the gas. It mostly enters your tank in the form of humid air. Once inside, the water condenses out of the trapped air in the tank and falls to the bottom of the pool, where it does its dirty work. If there is no air space at the top of your tank, there is no water vapor to condense inside, and your rust problems are considerably reduced. Naturally there are other alternatives. You can drain the tank absolutely dry. That works too. Step 10 - Ride often. (Or at least run the engine for a half hour each week...and then top up the tank with new, not stored, gas.) But here's a word of caution regarding that full gas tank. Modern Ethanol-mix fuel harbors bacteria that eat ethanol and piss Acetic Acid...which will eat everything metalic in your fuel system, especially aluminum parts. Yes, I know I just recommended filling a rusted tank up with 30% Acetic Acid, but I also said get it all out when you are done. The bacteria in your tank are kinda slow growers, but if a tank has been sitting for a month or so, even a completely full tank, the bacteria bloom is underway and will accelerate exponentially over time until the bugs die in their own piss. If you have ever seen and/or smelled green fuel in a tank, you have seen the aftermath of a bloom for yourself. If you are not going to keep fuel rotating through your tank (burning up the blooming bacteria and re-filling with fresh gas) then at least use a fuel preservative product like Stabil, to keep the buggers at bay for a few months. If it is going to be longer than that, drain that tank...completely dry. (Full disclosure: water does come into the tank mixed in solution with the ethanol in the fuel. Water does not mix with gasoline, but it does mix beautifully with alcohol, as your bartender can readily confirm. And any batch of ethanol-gas you get may have water trapped in the ethanol. If you get a tank with high water content, the next tankfull is likely to dilute the concentration of water in the tank. Just another reason to keep using the gas in the tank regularly.) So...either drain that tank dry or fill it full and burn some off every week. Don't give rust a chance. Like Neil says, better to burn up than it is to rust. |
Categories
All
Archives
January 2024
|
|
© WrenchMonster 2018
|
WrenchMonster™ is a Division of DemonLite, LLC.
|


 RSS Feed